

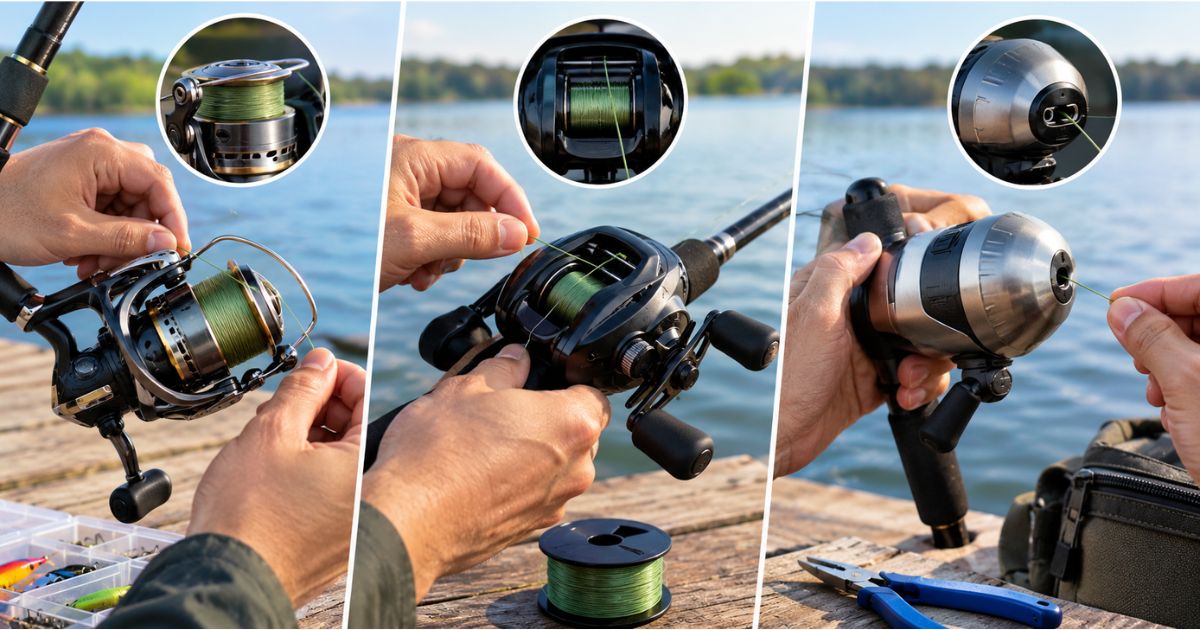
To put the fishing line on a reel, thread the line through the rod guides, open the bail (on a spinning reel), and tie the line to the spool with an arbor knot. Close the bail, then crank while keeping light tension on the line. Fill the spool to about 1/8 inch from the edge, then trim the tag end.
Quick Answer: 7 Steps
- Match the line weight to the rating on your reel.
- Thread the line through the rod guides, from the reel to the tip.
- Open the bail (spinning reels) and tie an arbor knot to the spool.
- Close the bail and trim the tag end.
- Wind slowly with light tension on the line.
- Check for a twist every 10 or so cranks, and flip the spool if you find any.
- Stop at about 1/8 inch below the spool lip.
What You Need Before You Start
- Fishing line that fits your reel (see the next section)
- Your reel, mounted on the rod
- Scissors or line clippers
- A damp cloth or your fingers to hold tension
- Optional: a line winder or spool holder, and a drill if you’re stripping old line
Which Line Goes on Which Reel?
Start with the line rating on your reel. Most reels list the line weight they’re built for, often on the spool itself or in the manual. Stay inside that range. A heavy line on a light reel causes problems.
Lew’s advises that spinning reels work best with monofilament or fluorocarbon no heavier than 8-pound test. The heavier line moves through the guides less smoothly and cuts casting distance.
Here is how the three main line types compare for spooling:
| Line type | Memory (coils) | Spooling tip | Good for |
| Monofilament | Higher | Check for twist often | Beginners, all-around use |
| Fluorocarbon | Higher | Check for twist often | Clear water, sensitivity |
| Braided line | Very low | Needs backing or tape, or it slips | Distance, sensitivity, thin diameter |
Memory means how much the line wants to stay in the coiled shape it had on the spool. High-memory lines twist easily. Braid doesn’t, which is why it behaves differently.
How to Put Line on a Spinning Reel (Step by Step)
Step 1: Thread the rod. Pull the line off the spool and run it through each guide, starting at the reel and finishing at the tip. Do this first so you don’t have to cut and retire later.
Step 2: Open the bail. The bail is the metal wire arm that guides the line onto the spool. Flip it open.
Step 3: Tie on with an arbor knot. The arbor is the center of the spool. Wrap the line around it, then tie it with the arbor knot (full steps below).
Step 4: Close the bail and trim. Cut the tag end close to the knot.
Step 5: Set the new spool. Place the line spool on the floor or in a holder with the line coming toward you.
Step 6: Wind with tension. Pinch the line between your fingers or a damp cloth a few feet ahead of the reel. Turn the handle at a steady pace.
Step 7: Check for twist and fill. Details on both are below.
Which Way Should the Line Come Off the Spool?
This is the step most guides skip, and it’s where the twist starts.
Lew’s calls it the flat spool method. Lay the supply spool flat so the line peels off counterclockwise. If it comes off clockwise, the line twists. If you get a twist anyway, flip the spool over.
The other option is the upright spool method. Stand the spool on its edge in a holder, so the line comes off the top and straight toward the first guide.
Don’t memorize which side faces up. Test it instead, using the Dangle Test below.
How to Tie the Arbor Knot
The arbor knot grips a smooth spool without slipping.
- Wrap the line around the spool arbor.
- Tie an overhand knot around the main line (the standing line).
- Tie a second overhand knot in the tag end, a short distance from the end.
- Pull the main line so the first knot slides down snug against the arbor.
- The second knot acts as a stopper. Trim the tag end.
Mossy Oak uses a slightly different approach for spinning reels, with an overhand knot and half-hitches. Both can hold, but the arbor knot is the one most guides recommend.
How to Put Line on a Baitcasting Reel
Baitcasters are actually simpler to spool. The line goes on in a straight path.
- Match the line weight to the reel’s rating.
- Thread the rod from the tip down to the reel, then through the reel’s level wind (the guide that moves side to side).
- Tie on with an arbor knot around the spool and trim the tag.
- Set the supply spool on its side. Mossy Oak suggests a handy trick: push a pencil through the spool and two sides of a box, so the line feeds off cleanly.
- Keep rod, reel, and supply spool in a straight line while you wind.
- Wind with firm tension, then fill to about 1/8 inch below the spool edge.
After spooling, adjust your brakes and spool tension per your reel’s manual. A freshly spooled baitcaster can backlash if those are off.
How to Put Line on a Spincast Reel
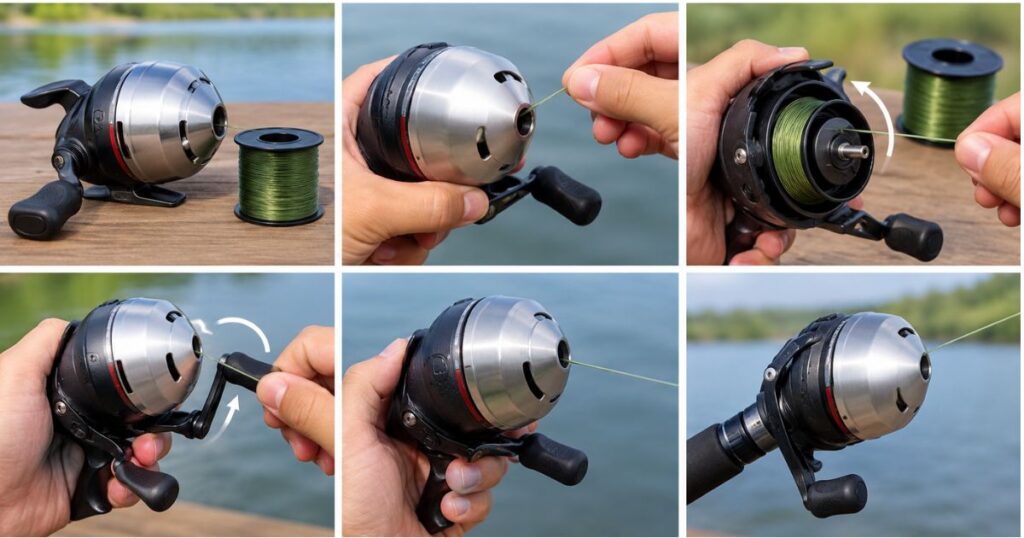
Spincast reels (the closed-face kind with a button) use the same logic, with one extra step.
- Remove the nose cone by unscrewing or pulling it off, per your model.
- Thread the line through the hole in the cone, then through the rod guides.
- Tie an arbor knot to the spool.
- Wind on the line with light tension, stopping a bit short of the lip.
- Replace the nose cone.
How Full Should You Fill the Spool?
Here’s where competitors disagree. Lew’s says to stop at about 1/8 inch from the spool’s outer edge. Mossy Oak says about 1/16 inch.
The practical answer: stay near 1/8 inch. Both sources agree on the reason. Too little line shortens your casts. Too much line spills off the spool and causes tangles. Lew’s notes that filling all the way to the edge makes bird’s nests likely.
If you’re unsure, err on the slightly under-filled side. It’s easier to add a line than to strip it.
How to Spool Braided Line Without It Slipping
The braid is so slick that it can slip around the spool, even with a good knot. Lew’s recommends attaching a length of monofilament or fluorocarbon to the spool first, then tying it to the braid.
Because the braid is much thinner than mono at the same strength, it uses less space. Many anglers fill part of the spool with cheaper mono as backing, then add braid on top, so they don’t waste it.
A simple braid setup:
- Tie mono backing to the spool with an arbor knot.
- Wind on backing until the spool is partly full.
- Join the braid to the backing with a strong line-to-line knot, such as a uni knot.
- Wind on the braid under tension, then fill to about 1/8 inch.
Good to know: braid has no memory, so it won’t twist from the supply spool’s direction. You can lay the spool either way. You still need tension. Slack braid can dig into itself on the spool.
How to Remove Old Fishing Line
You can’t add a new line over an old line that’s tired or tangled.
The easy way: Open the bail, tie the old line to a Phillips screwdriver chucked in a drill, and run the drill slowly. The old line winds onto the screwdriver. Slow down near the end, and unwind the last few turns by hand. This is Mossy Oak’s trick, and it’s especially handy for large reels.
The manual way: Pull the line off by hand, or use your hand to crank it onto a spare spool.
When to replace line: Look for fraying, flat spots, kinks, or a stiff, curly feel. A time rule doesn’t fit everyone, because it depends on how often you fish and in what conditions. Condition beats the calendar.
The Dangle Test: A 10-Second Twist Check
Twist is the number one reason a new spool misbehaves, and it’s easy to catch early. Try this after about 10 cranks:
- Stop winding. Open the bail.
- Let go of the line, keeping the rod tip up.
- Watch the slack line hang.
- If it hangs straight, you’re good. Close the bail and keep winding.
- If it curls or corkscrews, flip the supply spool over and keep winding.
Lew’s suggests a similar check every 15 or so cranks. Mossy Oak recommends checking after 8 to 10. Early and often is the safe rule.
Common Mistakes and How to Fix Them
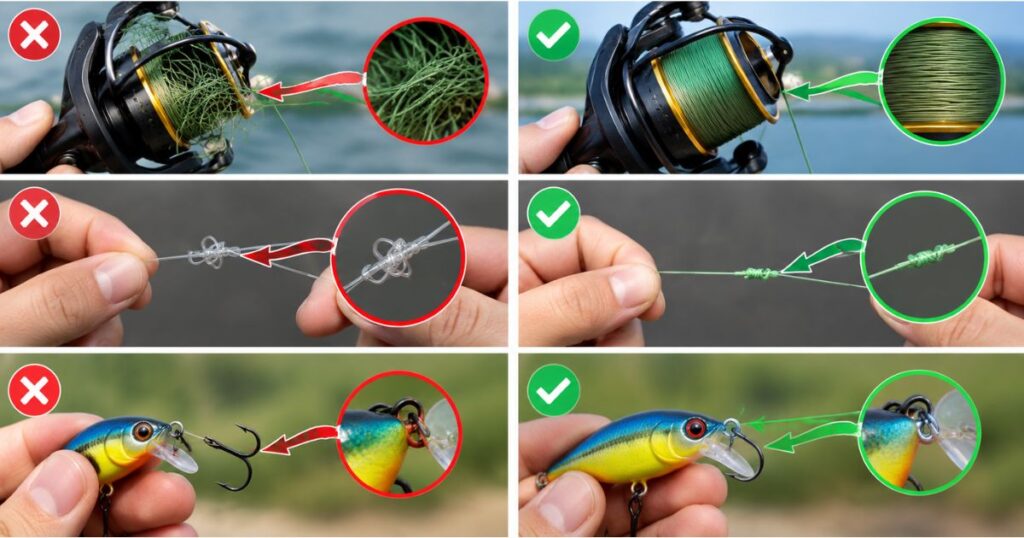
| Problem | Likely cause | Fix |
| Line twist | Supply spool turned the wrong way | Flip the spool, then run the Dangle Test |
| Bird’s nest after the first cast | Spool overfilled | Strip a few feet of line |
| Short casts | Spool underfilled, or line too heavy | Add line, or use lighter line |
| Braid slipping on the spool | No backing or tape | Add mono backing |
| Loose, spongy winding | No tension while spooling | Respool with tension |
| Knot pulls free | Knot not snugged down | Retie and moisten the knot before tightening |
Do You Need a Line Winder?
No. You can spool a reel perfectly well with a spool on the floor and your fingers for tension.
A line winder (or spooling station) can still help. It holds the supply spool steady and often keeps tension even, which is useful if you spool often or want a hands-free setup. It’s a convenience, not a requirement.
Key Takeaway
Match the line to your reel, tie an arbor knot, wind with tension, check for twist early, and stop around 1/8 inch from the spool lip. Add backing for the braid. If your line ever twists, flip the supply spool.
FAQ
How much line should I put on my reel?
Fill the spool to about 1/8 inch from the outer edge. Too little shortens your casts, and too much invites tangles. Also check the line capacity listed for your reel.
Can I put a new line over the old line?
It’s best to remove the old line. Old lines can be weak, kinked, or tangled underneath, and a problem hidden there can undo your new spooling. The exception is using old mono as backing under braid, but only if it’s in good shape.
What knot do I use to attach a line to a reel?
The arbor knot is the standard choice for most reels. It grips the spool without slipping. For braid, add mono backing first, then join the braid with a line-to-line knot like the uni knot.
How often should I replace fishing line?
There’s no single schedule. Replace it when you see fraying, kinks, flat spots, or stiffness, or after a hard snag. If it feels weak or curly, it’s time.
Why does my line twist?
Usually because the line came off the supply spool in the wrong direction. Flip the spool over and check again with the Dangle Test. Using a line that’s too heavy for the reel can also add to it.
Do I need backing for a braided line?
It’s strongly recommended. Braid can slip on a bare spool, and backing also saves braid by filling the spool with a cheaper line. It’s one of the easiest upgrades you can make.
