

You found the perfect spot. Your rod is ready. Now you just need to connect the hook to the line.
That one little knot decides whether you land the fish or lose it. If you’re learning How to Tie a Fishing Hook, the good news is that it’s easier than it looks, and you can learn it in about five minutes.
Short answer: Use the Palomar knot. It’s simple, strong, and works on every common line type. Below, you’ll get the exact steps, the mistakes that make knots fail, and a quick check to make sure yours will hold.
What You Need
Grab these before you start:
- A hook (any size with an eye)
- Fishing line (mono, fluorocarbon, or braid)
- Line clippers or scissors
- A little water (or saliva, which anglers have used forever)
- Pliers or a hook holder, if the hook is small or sharp
Tip: Practice with a large hook and thick line first. Everything is easier to see.
How to Tie a Fishing Hook with a Palomar Knot
A few words you’ll see below:
- Hook eye: the small hole at the top of the hook.
- Standing line: the long part that runs back to your reel.
- Tag end: the short loose end you trim at the finish.
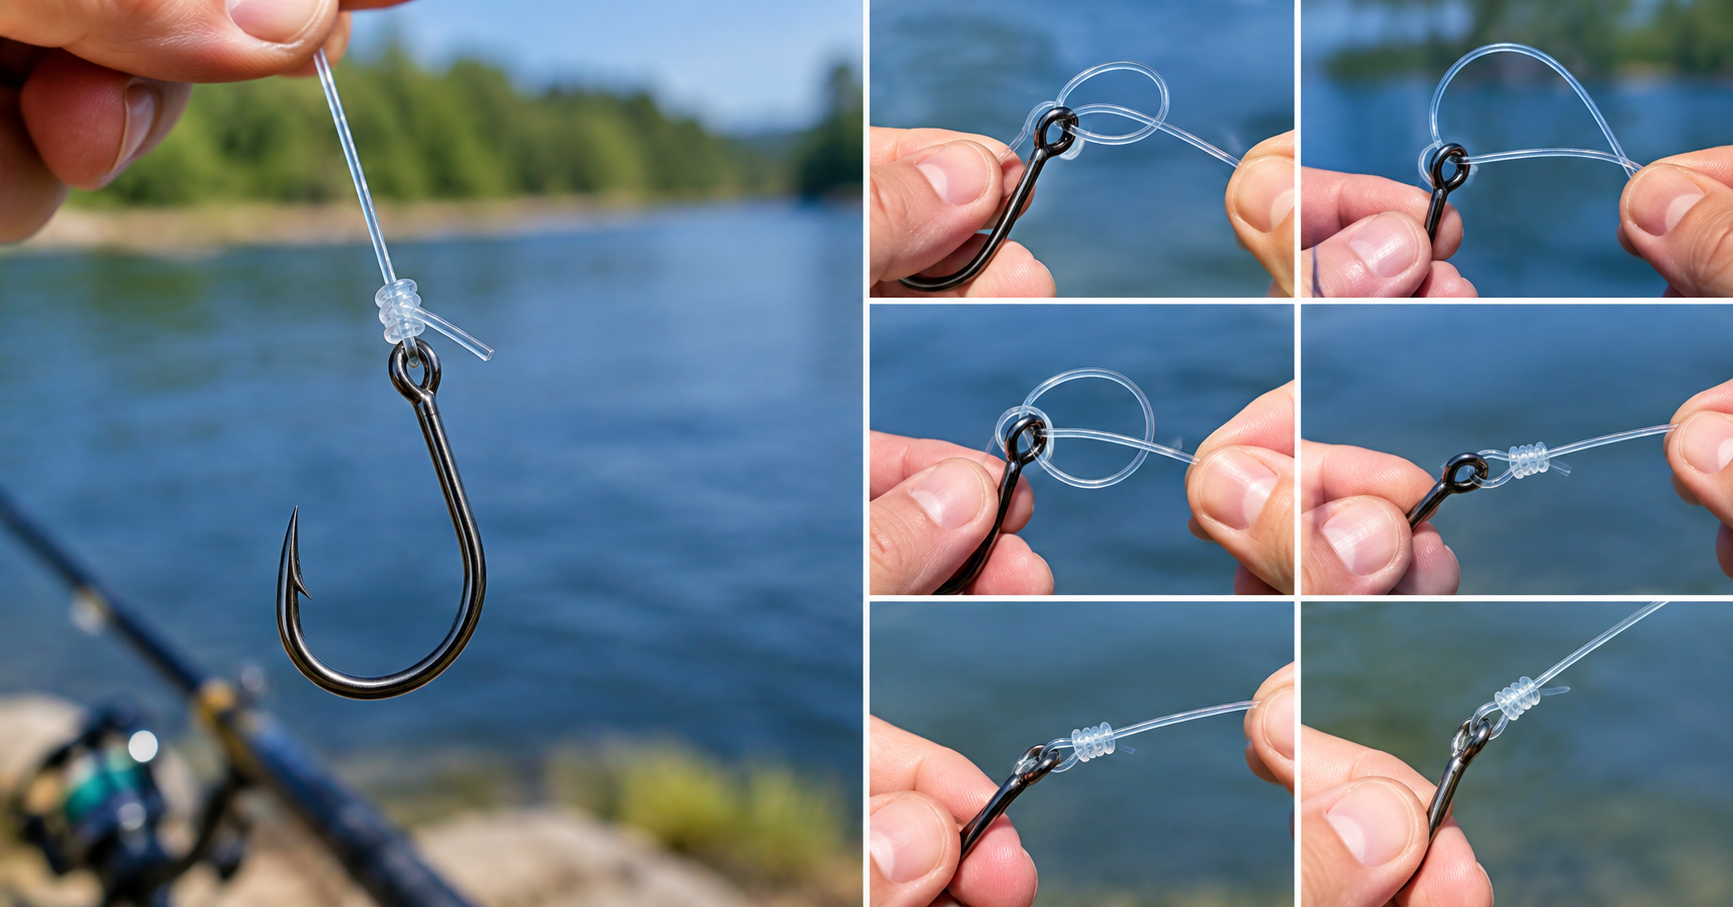
Step 1: Double the line. Fold about 6 inches of line back on itself to make a loop.
Step 2: Thread the loop through the eye. Push the loop (not the loose ends) through the hook eye.
Step 3: Tie a loose overhand knot. Treat the doubled line like one piece of line and tie a simple overhand knot, the kind you’d start tying a shoe with. Let the hook hang loose below it. Don’t let the two strands twist around each other.
Step 4: Pass the loop over the hook. Take the end of the loop and slide it completely over the hook, then pull it down past the eye.
Step 5: Wet and tighten. Lubricate the knot with water, oil, or saliva before pulling it tight, then tighten with slow, steady pressure. Pull both the standing line and the tag end.
Step 6: Trim. Cut the tag end, leaving about 1/8 inch. Too short can slip. Too long can tangle.
That’s it. Once it clicks, you can tie it in seconds. Animated Knots notes it can even be tied in the dark.
One small detail that matters: Pull the final loop down around the bight below the eye, which leaves the hook free to rotate in the knot. Some diagrams show it snugged against the hook shank instead, but most experienced anglers prefer the free-rotating version.
The one annoying part: The hook has to pass through the loop, so make the loop large enough. Tiny flies and lures are the hardest to handle.
Why the Palomar? Strength vs. the Clinch
Two knots dominate beginner advice: the Palomar and the clinch (especially the improved clinch). Here’s how they compare.
| Palomar | Improved clinch | |
| Difficulty | Easy, but you pass the hook through a loop | Easy, but you count wraps |
| Best for | Braid and general use | Mono and fluorocarbon |
| Typical test result | High (see below) | Good, but more variable |
| Common mistake | Twisting the doubled line | Too few wraps, sloppy coils |
What do real tests show? Honestly, the numbers vary a lot, and that’s worth knowing:
- In one test, the Palomar held 89% of the line’s strength, while a five-turn improved clinch came in at 75%.
- In another, the Palomar held 91.36% against 85.15% for the improved clinch.
The pattern is consistent even when the numbers aren’t: the Palomar tends to come out ahead. Different testers, lines, and tying care produce different results, so treat any single percentage as an example, not a promise.
That’s also why how you tie matters as much as which knot you pick. One source notes that most knot failures come from improper technique.
Does Your Line Type Change Things? (Mono, Fluoro, Braid)
Yes, a little. Different lines grip differently.
| Line type | Feel | Best bet | Tip |
| Monofilament | Stretchy, grippy | Palomar or improved clinch | Wet it well. Friction can weaken mono. |
| Fluorocarbon | Stiff, slick | Palomar or improved clinch | Tighten slowly. Stiff line can seat poorly. |
| Braid | Thin, very slippery | Palomar | Wrap-style knots need extra turns or they slip. |
Why braid is the tricky one: Braid slips more easily than mono. Take Me Fishing suggests the Palomar as a good fit for braided line. If you prefer wrap-style knots on braid, Northland Tackle advises at least eight turns.
How many wraps for a clinch on mono? Guides commonly say five to seven, while a Massachusetts state angler guide says five or more. Braid needs more than that.
Read More: Essential Fishing Tips for Beginners
Why Does My Fishing Knot Keep Slipping?
It’s almost never bad luck. It’s usually one of these:
- Dry tightening. Friction heats the line and weakens it. Fix: wet the knot first.
- Pulling too fast. A jerk can cinch the coils unevenly. Fix: pull slowly and steadily.
- Too few wraps (clinch-style knots). Fix: use 5–7 on mono, at least 8 on braid.
- Crossed or messy wraps. Fix: keep the coils neat and side by side.
- Twisted strands (Palomar). Fix: keep the doubled line straight when you tie the overhand.
- Cutting the tag ends too short. Fix: leave about 1/8 inch.
- Wrong knot for braid. Fix: switch to the Palomar.
If a knot fails, don’t just retie it the same way. Look at the broken end. A curly, crimped tag end usually means it slipped. A clean snap near the knot usually means it was weakened by friction or pulled too hard.
How Do You Know Your Knot Is Good? The Tug Test
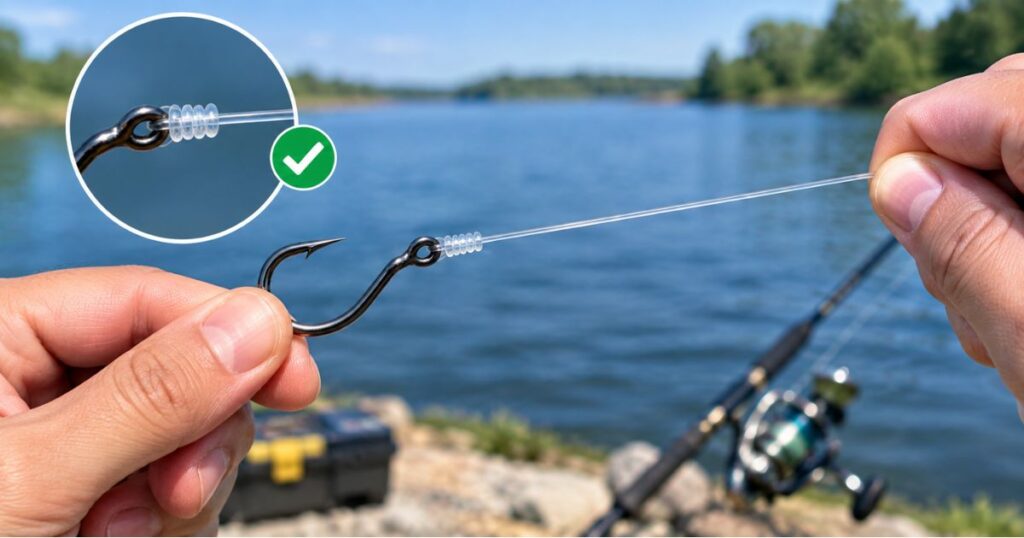
Never trust a knot you haven’t tested. Do this before you cast:
- Attach the hook to something solid, like a fence post, a door handle, or a friend’s hand.
- Step back and pull steadily, not with a jerk.
- Look at the knot. The wraps should be snug and even, and nothing should have shifted.
If it slips or looks uneven, cut it off and retire. Fresh line is cheaper than a lost fish.
The “Wet–Snug–Tug” Check
Here’s an easy way to remember it:
- Wet: lubricate the knot before pulling.
- Snug: tighten slowly, making sure every wrap sits neatly.
- Tug: test it before you fish.
Say it to yourself every time. It only takes ten seconds.
[Add your first-hand insight here.] For the strongest version of this article, add your own result: for example, tie the same hook five times with and without wetting, pull each until it breaks on a fish scale, and record what happened. Real numbers from you beat any generic claim, but don’t publish test data that you didn’t actually collect.
Hook Safety While You Tie
Hooks are sharp. A few habits keep your fingers safe:
- Hold small hooks with pliers or a hook holder.
- Keep the point away from your face and hands when you pull the knot tight. A slipping line can snap the hook back.
- Wear sunglasses when you tighten, especially around other people.
- Use clippers, not your teeth, to trim the tag end.
- Cap or cover hooks when you’re done.
Hook Eye Types and Sizes
Most hooks you’ll tie have a ring eye (a simple round loop). Some have eyes that angle slightly up or down, but the Palomar works the same way on all of them.
Two quick rules:
- Small eyes, thick lines? Thick lines may not fit through the eye twice (which the Palomar needs). Pick a smaller line, or a hook with a larger eye.
- Tiny hook? Use pliers to hold it, and make the loop big enough to pass over the hook.
FAQ
What is the easiest knot to tie a fishing hook?
The clinch knot is the easiest for many beginners, while the Palomar is nearly as easy and a better all-rounder. Either works well on light lines when tied carefully and wet before tightening.
What is the strongest knot for tying a hook to the line?
In published tests, the Palomar usually lands at or near the top, but results vary by line and tester. One test showed the Palomar holding about 89%–91% of line strength, ahead of the improved clinch.
How many wraps should I use for a clinch knot?
Five to seven wraps is standard for mono. Braid is slippery, so use at least eight wraps, or switch to the Palomar.
Can I tie a fishing hook on a braided line?
Yes. The Palomar is widely recommended for braiding because its loop design grips slippery lines better than plain wrap knots.
Should I wet the knot before tightening?
Yes. Lubricating the knot with water or saliva reduces friction and helps the wraps seat smoothly, which protects line strength.
How long should the tag end be?
Leave about 1/8 inch after trimming. Too short and it can slip under strain, too long and it can tangle.
